Getting Started - Linux server setup guide
Phoesion Glow is a complete cloud micro-service development solution.
This guide shows you how to setup your cloud on a single Linux machine.
Prerequisites
- A Linux (Ubuntu) machine
- A domain name*
- A Windows 10 developer machine with Phoesion Glow Blaze installed
Note
- If you do not have a domain registered you can either use the server's IP, edit your hosts file, or create a free domain using Duck DNS (www.duckdns.org) for testing
Installing cloud entities on Ubuntu
In this section, you will install and setup the components needed to create a full micro-service ecosystem on a Linux machine.
For more information about the architecture you can read the Architecture Overview
1. Install Repository key
wget -qO - https://packages.phoesion.com/apt.key.gpg | sudo gpg --dearmor -o /usr/share/keyrings/phoesion.gpg
2. Add Repository
echo "deb [signed-by=/usr/share/keyrings/phoesion.gpg] https://packages.phoesion.com/phoesion.glow linux main" | sudo tee /etc/apt/sources.list.d/phoesion.glow-main.list
sudo apt-get update
3. Install cloud entities packages :
sudo apt-get install -y phoesion.glow.kaleidoscope
sudo apt-get install -y phoesion.glow.lighthouse
sudo apt-get install -y phoesion.glow.prism
sudo apt-get install -y phoesion.glow.firefly
Tip
or use the single line command :
sudo apt-get install -y phoesion.glow.kaleidoscope phoesion.glow.lighthouse phoesion.glow.prism phoesion.glow.firefly
Note
Services will be installed under a new service user with username the entity name (eg. firefly), so you can adjust the rights for each entity service as you wish
Note
You can check the status of a services using
sudo systemctl status {service-name}
and to see the service logging you can use
sudo journalctl -u {service-name} -f
where {service-name} is you service, eg phoesion.glow.firefly
Note
Phoesion Glow Lighthouse default port is 15000, so make sure your developers can reach this port!
4. Setup cloud entities :
For a basic setup on a single machine no more configuration is required.
Create an administrator account for Lighthouse
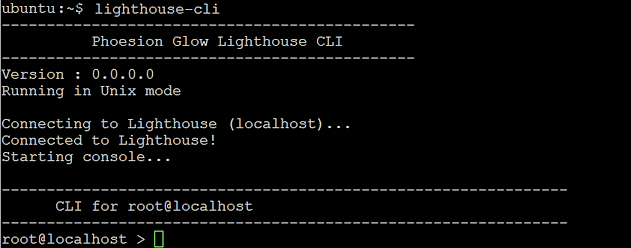
To be able to remotely connect to the Lighthouse you need to create an admin account. You can do this using the lighthouse-cli tool.
1. Start lighthouse-cli
lighthouse-cli
2. Create a new administrator user
user add admin
3. Setup new administrator user
Enter the information for admin user
Password : YOUR_PASSWORD
Re-enter password : YOUR_PASSWORD
Role : 1
Name (optional) : Administrator
Email (optional) : [email protected]
Description (optional) : My Administrator Account

Leave Allowed IP empty, so you can login to the admin account remotely
Warning
Make sure for Role you enter is for an Administrator . Otherwise you will create a normal user with limited capabilities

Create a Lighthouse connection profile
The next step, is to create a connection profile in Blaze for the admin Lighthouse account.
This will allow you to connect to the Phoesion Glow Lighthouse using the Phoesion Glow Blaze app so you can deploy new services and manage your entire cloud.
Launch Phoesion Glow Blaze app from the start menu.

Create new lighthouse connection profile
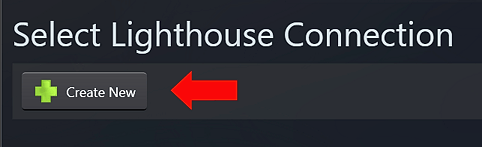
-
- Fill the configuration page

Connection Name : My Linux Server
Hostname : [YOUR_SERVER_IP]
Username : admin
For Authentication Method select Password
Password : [YOUR_PASSWORD]
For Security Method select RSA/AES
Note
Replace [YOUR_SERVER_IP] and [YOUR_PASSWORD] with your own values
- Click the Get button to retrieve the public RSA key from the lighthouse.
- Click Save
- Fill the configuration page
The new connection profile has been saved and is now available on the main screen
Click on it to connect to your Lighthouse instance.
Deploy your services
After completing the above steps your Ubuntu server should be fully setup and ready for you to deploy your services. You can now create new a Quantum Space and deploy your services, as explained in the next guide.